Dividing heavy jobs using BullMQ flows in NodeJS

Divide and conquer is a well-known programming technique for attacking complex problems in an easier way. In a distributed environment it can be used to accelerate long processes by dividing them into small chunks of work and then joining the results together.
BullMQ provides a powerful feature called "flows" that allows a parent job to depend on several children. In this blog post, we are going to show how this feature can be used to divide a long CPU-intensive job (video transcoding), into smaller chunks of work that can be parallelized and processed faster.
All the code for this blog post can be found here. Note that this code is written for a tutorial and not really a production standard.
Video transcoding
Transcoding of videos is a common operation on today's internet as videos that are uploaded to sites are often not in a suitable format for being reproduced on a webpage. The most common transcoding is performed to produce a standard format (often mp4) with a standard resolution and compression quality.
But transcoding is a quite CPU-demanding operation, and the time to transcode a video is normally proportional to the length of the video, so the process can become quite lengthy if the videos are really long.
Using the excellent video handling library FFmpeg we can transcode the videos from almost any known format to any other format. FFmpeg also allows us to quickly split a video into parts and also join the parts together. We will use these capabilities in order to implement a faster transcoding service using BullMQ flows.
Flow structure
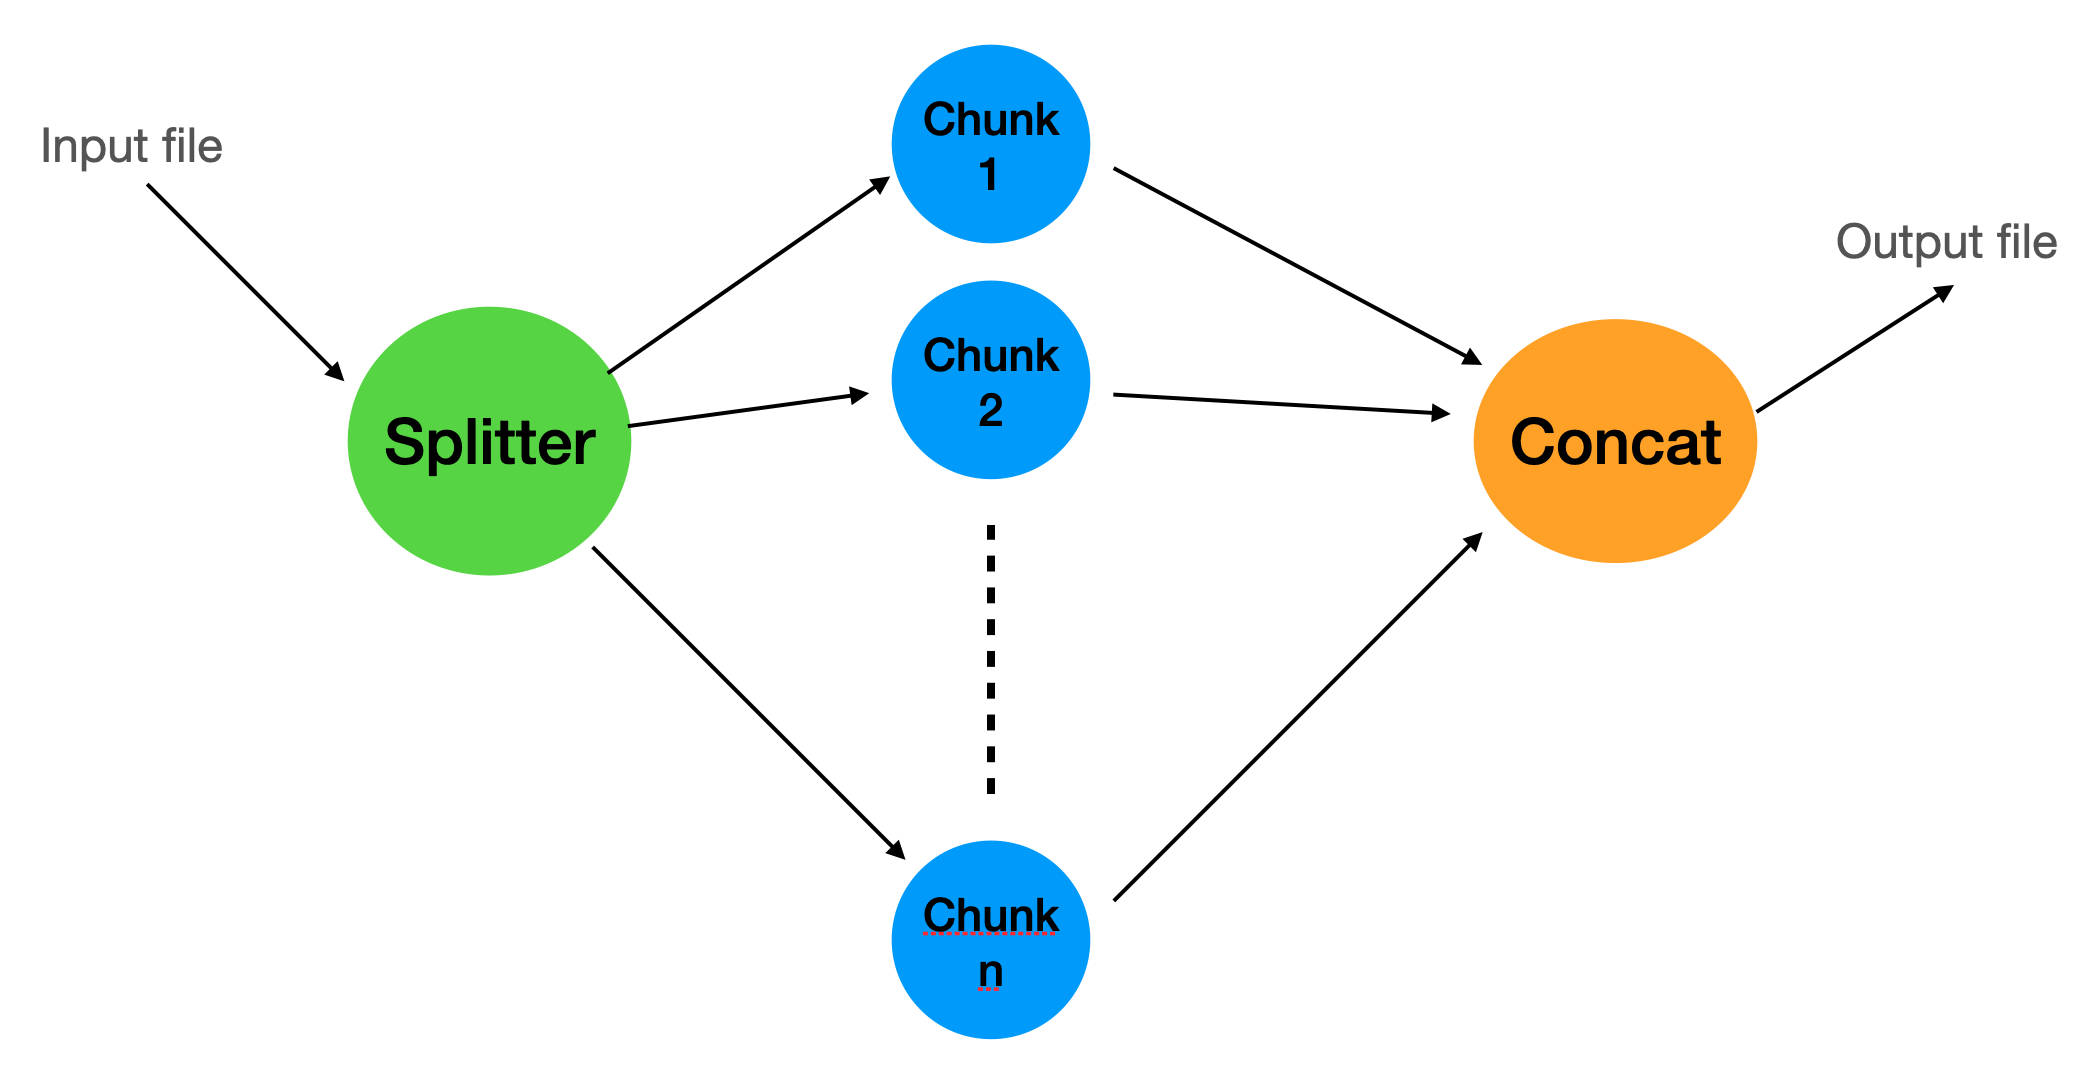
We will create a flow with 3 levels, every level is handled by a queue and a specific worker.
The first queue will take the input file and divide it into chunks and add a new job to the second queue for every chunk as well as a job to a parent queue that will be processed when all the chunks have been processed.
Here is a diagram depicting the whole structure:
File storage
For this tutorial we will, for simplicity, just use the local file storage, however, in a production scenario, we should use a distributed storage system such as S3 or similar so that all workers can access all data independently on where they run.
Worker Factory
Since we are going to use several queues, we will refactor the worker creation into its own function, this function will also create a queue scheduler so that we can get automatic job retries and stalled jobs handling if needed. We will attach a couple of listeners in order to get some feedback when the jobs are completed or failed.
For this application, even though it is very CPU intensive we will not use "sandboxed" processors because the call to FFmpeg is already spawning a new process, so using sandboxed processors would just increase the overhead.
Also note that although in this example we only use 1 worker per queue, in a production system we could have as many workers as we wish in order to process more videos faster.
import { Worker, QueueScheduler, Processor, ConnectionOptions } from "bullmq";

export function createWorker(
  name: string,
  processor: Processor,
  connection: ConnectionOptions,
  concurrency = 1
) {
  const worker = new Worker(name, processor, {
    connection,
    concurrency,
  });

  worker.on("completed", (job, err) => {
    console.log(`Completed job on queue ${name}`);
  });

  worker.on("failed", (job, err) => {
    console.log(`Faille job on queue ${name}`, err);
  });

  const scheduler = new QueueScheduler(name, {
    connection,
  });

  return { worker, scheduler };
}
Splitter Queue
The process starts with a queue "splitter" where a worker will take the video input and split it into similar-sized parts that can later be transcoded in parallel. Since the whole point of splitting is to accelerate the transcoding process, we need the split to be very fast, for this we can use the following FFmpeg flags: "-c copy -map 0 -segment_time 00:00:20 -f segment", they will split the file into around 20 seconds chunks without re-encoding, more information can be found in stackoverflow. It is possible there are other chunk sizes that are more optimal, but for this example, 20 seconds is good enough.
After the video file has been split we need to parse FFmpeg output to get the filenames of every chunk, and with this information create a BullMQ flow that will process every chunk, and when all chunks are processed a "parent" worker will concatenate the transcoded chunks into one output file.
export default async function (job: Job<SplitterJob>) {
  const { videoFile } = job.data;

  console.log(
    `Start splitting video ${videoFile} using ${pathToFfmpeg}`,
    job.id,
    job.data
  );

  // Split the video into chunks
  const chunks = await splitVideo(videoFile, job.id!);
  await addChunksToQueue(chunks);
}

async function splitVideo(videoFile: string, jobId: string) {
  // Split the video into chunks
  // around 20 seconds chunks
  const stdout = await ffmpeg(
    resolve(process.cwd(), videoFile),
    "-c copy -map 0 -segment_time 00:00:20 -f segment",
    resolve(process.cwd(), `output/${jobId}-part%03d.mp4`)
  );

  return getChunks(stdout);
}

function getChunks(s: string) {
  const lines = s.split(/\n|\r/);
  const chunks = lines
    .filter((line) => line.startsWith("[segment @"))
    .map((line) => line.match("'(.*)'")[1]);

  return chunks;
}

async function addChunksToQueue(chunks: string[]) {
  const flowProducer = new FlowProducer();

  return flowProducer.add({
    name: "transcode",
    queueName: concatQueueName,
    children: chunks.map((chunk) => ({
      name: "transcode-chunk",
      queueName: transcoderQueueName,
      data: { videoFile: chunk } as SplitterJob,
    })),
  });
}
Transcoder Queue
In this queue, we add the chunks that are part of some video file. Note that the worker of this queue does not need any other information than the chunk file itself so it can just focus on performing the transcoding of that chunk as efficiently as possible. In fact, this worker is quite simple compared to the splitter worker:
export default async function (job: Job<SplitterJob>) {
  const { videoFile } = job.data;
  console.log(`Start transcoding video ${videoFile}`);

  // Transcode video
  return transcodeVideo(videoFile, job.id!);
}

async function transcodeVideo(videoFile: string, jobId: string) {
  const srcName = basename(videoFile);
  const output = resolve(process.cwd(), `output/transcoded-${srcName}`);

  await ffmpeg(
    resolve(process.cwd(), videoFile),
    "-c:v libx264 -preset slow -crf 20 -c:a aac -b:a 16k -vf scale=320:240",
    output
  );

  return output;
}It transcodes the input to an output file and returns the file path to said file.
Concat Queue
The last queue is the parent of the "transcoder" code, and as such will start processing its job as soon as all the children have completed it. In order to concatenate all the files we need to generate a special text file with all the filenames and feed it to FFmpeg:
async function concat(jobId: string, files: string[], output: string) {
  const listFile = resolve(process.cwd(), `output/${jobId}.txt`);
  await new Promise<void>((resolve, reject) => {
    writeFile(
      listFile,
      files.map((file) => `file '${file}'`).join("\n"),
      (err) => {
        if (err) {
          reject(err);
        } else {
          resolve();
        }
      }
    );
  });

  await ffmpeg(null, `-f concat -safe 0 -i ${listFile} -c copy`, output);
  return output;
}With this last worker, we conclude the whole process. I hope this simple example for videos is useful to illustrate how jobs can be split in order to accelerate the time it takes for lengthy operations. The complete source code can be found here.
Follow me on twitter if you want to be the first to know when I publish new tutorials and tips for Bull/BullMQ.
And remember, subscribing to Taskforce.sh is the greatest way to help supporting future BullMQ development!